August 31, 2007

Modify an old CD to read DVD Disk


If ever you have an old CD-ROM drive and want to experiment on something, you can try this stuff. CD ROM above 40x has an easier procedure compare to CD-ROM at lower speed.Practically mostCD-ROM's can be modified to read DVD disk.

Procedure for CD-ROM 40X and under:(Trial and Error Procedure)
  1. Open your CD ROM cover, locate the lens assembly, behind it there is a small trimmer(you have to use a jeweler set to rotate it),Adjust it randomly until your CD read a retail DVD Disk.The concept behind it is to fine tune the size of the laser beam to be able to read the pit of a retail DVD Disk(DVD5).Do not use a DVD9 format it wont work.Be patient on this part it might not work on a few tries.

  2. Once you got the adjustment right disable the 12 volts supply of your CD-ROM(cut or remove the yellow wire from the molex connector of your power supply),tape it to avoid short circuit. The purpose of this is to lenghten the life of your CD-ROM while playing DVD Disk.

Procedure on CD-ROM above 40X:

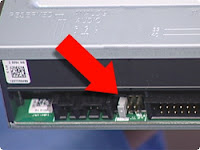
  1. To avoid extra cost in production,CD/DVD manufacturer produce the same circuit boards for both CD/DVD products, they only disable the DVD function for circuit boards installed in CD ROM. Now locate the label that says "DVD Jump" at the back of your CD-ROM printed board.

  2. Once you find the label, jumper it using a thin wire, make sure that there is no short circuit with other connections.Now try it, if it can read a retail DVD Disk.

  3. Follow step 2 above in disabling 12 volts of its supply.

Note:Modified CD ROM cannot be functional at DOS.It cannot read DVD 9 format.I suggest that do not experiment on your existing CD-ROM,it might mess up the whole thing.Get a spare CD-ROM to experiment. This technique might not work on all brand of CD.

Source:Techarena

No Sound Outpot(Unusual Problem)


Problem was encountered in Windows XP

Problem Background: Just installed a new OS (Windows XP) everything is working fine, except when you play a sound nothing is heard. I check the audio properties at control panel, it is properly installed. We suspect that it has a defective onboard audio chipset, so we replace a PCI sound card, still the same problem. What I did is reformat the harddrive and repeat the whole installation process, and there you go sound comes back.

Cause of the Problem: Upon studying the case, it was found out that end-user tests Windows Media player in Windows XP without the sound driver installed yet. Windows loads a default sound device which is not its current audio device. Even if you installed the sound driver afterward, it wont revert to the actual sound device.

Note: To avoid this kind of a problem make sure to load the driver of your audio device first, before running Windows Media player

August 29, 2007

Cannot Install Windows (Indicates CD Disk Problem)

Case: The unit was just purchased a week ago.
Problem(s) Encountered: Cannot install Windows XP, it indicates cannot read specific files on your CD disk during initial installation. When you reboot and try to re-install windows it will indicates another files that it cannot read.
Solution(s) Made: We replace a different installation disk and a different CD-ROM drive, problem still the same. We replace another memory module, it installed windows properly.It was found out that it has a defective DDR memory.

CD-ROM Stacked up!(Money Saver)


One day you noticed that your DVD/CD-ROM drive is hard to or do not eject at all even if you already spent lot of times pushing its eject button. You checked at "My Computer" the CD is detected by the system. Before thinking of replacing your DVD/CD-ROM device, I suggest trying this simple trick I have found.

  1. Turn off your CPU, eject your CD tray by inserting a paperclip/small pin on the manual eject hole infront of your CD panel(locate the pinhole at the front panel of your CD)to push out the CD tray.
  2. Once the tray is ejected insert it with a known good disk and push the tray back to return to its base.
  3. Now turn on the power and browse "My computer" to check if the disk you inserted is being read by your CD/DVD.
  4. If it functions normally, try to push the eject button if it will eject normally.
  5. The trick is that you always have to put a disk on your CD/DVD ROM, if by chance you can eject your CD tray while your CPU is ON, you can bypass steps 1 to 4.

The reason behind the problem is that the spindle motor of your CD/DVD ROM developed a strong magnet causing it to stacked when attached to its upper holder,disallowing the cd tray motor to push the tray out.When the CD disk is inserted, the gap between the two parts widen, making it easier for the CD tray motor to push the tray out.

Note: If none of the above mention works, its possible that your CD/DVD ROM is already defective.

Unit is black-out after moving in a new location

You just move in to a new place or location, when you turned on your PC it power's on but it did not initialize(No Display).Dont panic, performs the following:

1.Check the output voltage of the AC outlet if its in the especified voltage, it you dont have a multi tester try plugging to a known good AC outlet.
2.Check the power cord if it is inserted in the proper outlet of your AVR, some AVR has 110 and 220 outlet(Applicable only in countries when the voltage rating is 220V).If you happen to insert the power cord in the 110V outlet CPU will not initialize(No Dsiplay) or it may initialize but CPU will resets continuously.

If you happen to encounter such problem in the future,make sure to perform first the steps above before suspecting a defective CPU.

Installing a new CD-ROM or Harddrive

1. Make sure that jumper setting of your existing and new CD/HDD are not the same, otherwise both device cannot be detected by your system. Jumper settings is located at the back of the device.


Leftmost Jumper: Master
Center Jumper: Slave (left open in HDD)

2. Make sure that IDE cable is inserted properly, remember that pin 1 will always be positioned beside the power supply connection of the device. If your system wont boot or blacked out after you insert a new CD or HDD, try checking the cable position.

August 27, 2007

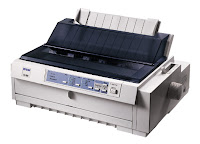
Self-test on Epson dot matrix products!


This topic will be helpful if you are encountering printing problem in your PC with an epson dot matrix products!

1. Power on unit (It should initialize and a steady green power will indicate)
2. Insert paper on the manual feed paper bin
3. Turn off unit, press hold LF/FF or Load/Eject button while turning on the power
It should start printing by now a combinations of text and characters.
If printer prints normally it means that it is in working condition. The problem may be caused by its printer cable or by your CPU.
Note: Make sure to printer finish printing for at least 1 page.

August 26, 2007

PC reset/shutdown intermittently!(Processor Overheats)


The problem may occur to almost all type of PC, especially on processors with higher speed(AMD Duron700 to Intel P4 Proc).There are a lot of possible causes why a system reboots intermittently, it maybe a software or a hardware problem, But sometime there is an area we often neglect in troubleshooting and that is the cooling system of your processors. Processor temperature must be maintained to a certain level, when it rises higher to its usual temperature it may reset or shutdown your PC intermittently.Please do the necessary steps below before you suspect of a hardware or software failure, it may save you time and money.
  1. Check and observe if your processor fan is running smoothly, it may be running slow. Replace your processor fan right away if it is defective.
  2. If you think your processor fan is running just fine, try to check the air passage just beneath the fan it maybe clogged up with dust, denying the air to reached down to the bottom of your processor heatsink, causing the processor to overheat during operation.
  3. Remove the processor heatsink and inspect the area around the processor, if maybe covered with dust.

Note: AMD Duron/Athlon processors for socket 462 generate lots of heat compare to its Intel counterpart, making this kind of processors more vulnerable to damage. Regular checking and cleaning of your processors cooling system will avoid this kind of a problem.

August 24, 2007

Restoration of backed up data from Outlook Express


You have a new OS, its time to bring back the data, address book and your internet settings account to your harddrive.In the case of your address book and internet account settings just simply follow step 1 and 2 of my previous post, but instead of clicking export click import, then go to the path were your back-up files is located. The last step is restoration of all your mailbox folders.At the file menu(refer to graphic above) click file>import>messages>select program "Microsof Outlook Express 6" then click next> select "Import mail from OE6 store directory" then click OK> Browse to the outlook express you backed up> click next to restore all your OE data(inbox, sent items, drafts ......etc).You may opt to restore your folders selectively.

How to back-up your Outlook Express Messages & Address book (Part 1)

Today I will feature procedure in backing up "outlook express" data, address book and its mail settings account. This procedure is very useful if you are planning to reformat your drive and dont want to loss a single data.
Step 1: Procedure in backing up Address book:Open outlook express >(at the menu bar) click tools > click address book >click file> click import> select address book(wab) > then it will prompt you were to save the files(you can name it whatever you want)

Step 2: Procedure in backing up Internet accounts settings:The next process is backing up your internet account settings.(These are the user name,password, pop and smtp settings..etc)Click tools again of your outlook express> click accounts>click Mail Tab>click import> enter a file name and save it to a folder.

Step 3: Now we are almost done,the last part is saving all your folders at outlook(inbox,sent items...etc).Be careful on following the procedure to avoid wrong saving of data. First identify the path where's the mailbox of your outlook is located.Open outlook express,at the left side of it,you can see the "folders"window.Put you mouse pointer on the "inbox" folder,then right click on it then click properties> at the property window click the mouse as indicated on the illustration(Refer to graphic above) and scroll sideward until you reached at the end, take note of the exact location of the folder. Now using windows explorer follow the folder path until you reach the exact mailbox location of your outlook express. Take note that before you follow the path of your mailbox location be sure to set your files settings to "view all files at the folder options" otherwise you cant see it since its a hidden folder.Once you found out the folder, save the whole folder to a specific location(Normally its labeled "Outlook Express").Now you can save those 3 data to a backup harddrive then reformat your hard drive. Take note that the procedure in backing up those mentioned data can be in any order. I will discuss the procedure in restoring those data on my next post.

August 23, 2007

Unit is Blackout(Case 3)

Unit Description: P4 3Ghz (socket478)
Asus Motherboard
Problem(s) Encountered: Blackout
Problem(s) Found: Reset switch is shorted causing the system to be on a continous reset mode.We found out the problem after we test the mainboard out of the casing without installing the button switches.
Solution(s) Made: Reset switch was disconnected from the mainboard
Note: When isolating a blackout unit make sure to remove button switches or devices attached to the mainboard.

August 22, 2007

Printing slows down after printing 1st page


Unit Description: Pentium III-600
128 SDRAM,Windows98
Problem(s) Encountered: Printing(Canon Inkjet Printer) slows down after printing one page
Problem(s) Found:A problematic soundcard device(We discover the problem after a lenghty troubleshooting process)
Service Done: Replace Sound Card Device
Note: When isolating a certain problem try to remove other device attached to your pc

August 21, 2007

Unit is Blackout(case 2)


Unit Description: P4 IBM Compatible PC, Dual type memory slot
256 SDRAM Mem
Problem(s) Encountered: Unit is Blackout(No Display), do not POST(Power-on-self-test)
No Beep, Numlock at keyboard not responding when pressed
Problem(s) Found: Dirty memory card edge
Solution Made: Remove memory and cleaned card edges using a pencil eraser. Operation of Unit back to normal
Note: If problem still exist try replacing a known good memory.

August 20, 2007

Internet Explorer Indicates Page Cannot Be Displayed

Unit Description: P4 IBM Compatible PC
OS: Windows XP
Problem(s) Encountered: Page cannot be display indicates in the browser, Even if Internet Connection is active(dial-up connection).
Problem(s) Found: System is loaded with Cookies and Temporary Internet files
Service Done: Clear cookies and temporary internet file. At the menu page of your internet browser click tools>internet options> delete cookies and delete files, then restart PC.
Note: If still wont work after restart, then its a different case!

Unit is Blackout(Case 1)


Unit: IBM Compatible PC
ATX-AMD Duron700
64 MB SDRam Mem
Problem(s) encountered: When unit is turned on,No Display-No Beep.But when you resocket mem or reset CMOS Batt unit, it intermittently starts up, but blacked out when you restart the PC.
Problem(s) Found: A defective Motherboard, ATX switching circuitry is not functioning properly
Service Done: Replace Motherboard
Note: We test all the other pheripherals on a known good motherboard before coming up a conclusion.

What's this Blog all about?

Welcome!my journey as a PC repair technician started March of 1994 where Apple and IBM8088 computers is still dominating the market, it was also the time where IBM just started the release of their X86 PC series. What I like most of being a PC repair technician is the constant challenge it brings through different problems I encounter almost everyday. But PC repair a decade ago is a bit complicated compare to todays setup.Now, ordinary hobbyist and end-users can assemble or troubleshoot his own PC. I have created this blog to document my present and previous experiences on different computer problems I encountered at work, and hope someday it will be a source of useful reference to technicians, students, hobbyist and end-users alike who are eager to learn the science of computer repair.Its my own little way of sharing my expertise to the world. I am not a good writer, but I will do my best to make my post simple and easy to understand. Your comments and suggestions are most welcome and everyone can contribute thru a forum I created( link is at the buttom of this page).